

Welcome to the first part of the Elasticsearch Python workshop. This series will set the focus from a Python programmer’s perspective and I hope I can shed some light on the mini-ecosystem that has been building up with Python clients and tools to extra data from an Elasticsearch cluster. Especially when you are a data scientist, this series might save you some time. Like in all workshops: to keep the article compact, I cut the code into snippets. But you can download the complete code from the GitHub repo for this workshop. With that being said, let’s jump right in.
I used in Elasticsearch Migration 6.22 to 7.8.0 (sorry, this article is in german only) the python library Python Elasticsearch Client for the reindex task. To save you some time, we start with the installation and some basic configuration setups. This might be even handier since Elasticsearch 8.0.0 has enhanced security – just connecting to localhost without any security is by default not enabled. But first things first, let’s install the Elasticsearch client. The following examples are using Ubuntu 18.04 LTS.
Install the library
Install the latest Elasticsearch client with pip3:
sudo apt update && sudo apt upgrade
sudo apt install python3-pip
sudo python3 -m pip install 'elasticsearch>=7.0.0,<8.0.0'
sudo python3 -m pip install elasticsearch_dsl
Create your first connection
Let’s start easy and assume your cluster is pre-Elasticsearch=8.0.0 and you have no security implemented. Connect to ‚localhost‘ instead of a hostname if you did not expose your node to the network.
es = Elasticsearch(["http://srvelk:9200"])
es.cat.nodes()
That’s it. Pretty straightforward without security, right? Ok, let’s see what needs to be done when security is enabled.
Create a connection with security enabled
For establishing a connection over a secure cluster, we need one more pip module installed (it might be installed already, just make sure you have it):
sudo python3 -m pip install urllib3You might not have a certificate yet, but you need at least a username/password. You can set up your connection like this:
from ssl import create_default_context
from elasticsearch import Elasticsearch

es = Elasticsearch(["https://username:password@srvelk:9200"], verify_certs=False)
es.cat.nodes()
This will be working, but it will produce some nasty warnings. We better use certificates, so let’s create a pem-certificate if you don’t have one.
Generate the pem certificate
If you installed Elasticsearch 8 with the defaults, you probably don’t know the SSL-Keystore password for the cluster. But gently, Elastic provided a tool to read the password directly from the Keystore, but you need root privileges:
/usr/share/elasticsearch/bin/elasticsearch-keystore \
   show xpack.security.http.ssl.keystore.secure_password
This is the „import-password“, needed to add certificates to the Keystore. We create now with OpenSSL the certificate python_es_client.pem:
openssl pkcs12 -in /etc/elasticsearch/certs/http.p12 \
   -cacerts -out /etc/elasticsearch/certs/python_es_client.pem
Enter the password when you get prompted. Choose a PEM password of your choice. After that copy the pem file to a location where your python script has access. Storing your certificate in /tmp is not a good choice, this is just for demonstration purposes.
chmod 666 /etc/elasticsearch/certs/python_es_client.pem
cp /etc/elasticsearch/certs/python_es_client.pem /tmp
Let’s create another connection in Python:
from ssl import create_default_context
from elasticsearch import Elasticsearch

context = create_default_context(cafile='/tmp/python_es_client.pem')
es = Elasticsearch(["https://username:password@srvelk:9200"], ssl_context=context)
es.cat.nodes()
Having your username and password in your script is not preferred. What we need is an API key and connect to the cluster without credentials.
Connect with API key
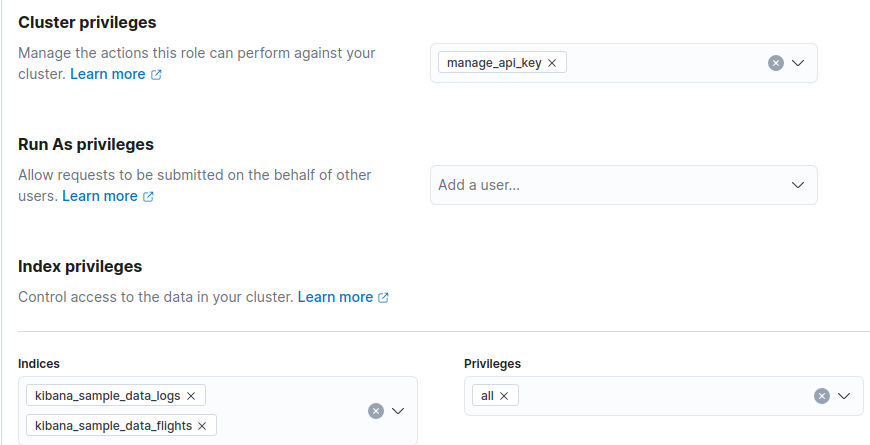
We need to create first a role. Go to Stack Management -> Roles and create a role. The role must contain at least the privilege „manage_api_key“
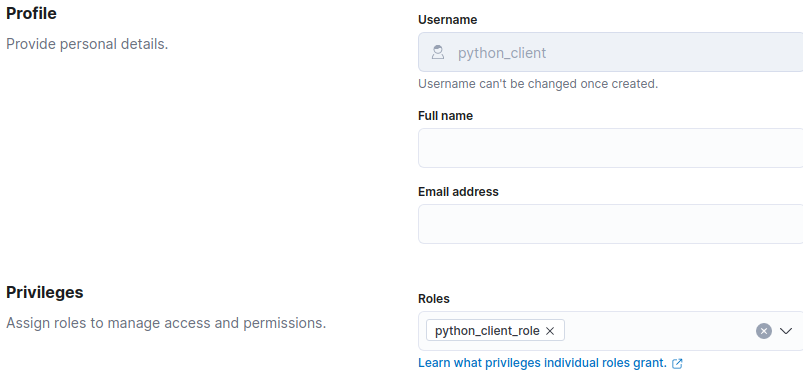
Now add this role to a user or create one. Go to Stack Management -> Users and add the role:
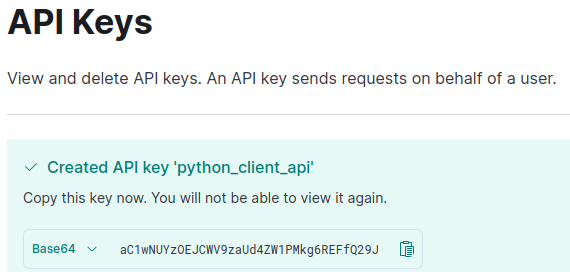
Now generate the API key. Go to Stack Management -> API keys and create the API keys for the user that needs access via API key. Please store the API key in a safe place after creation:
Let’s create another connection in Python:
from ssl import create_default_context
from elasticsearch import Elasticsearch

api_key='aC1wNUYzOEJCWV...RSjJMaEhvbDMyWElvZw=='
context = create_default_context(cafile='/tmp/python_es_client.pem')
es = Elasticsearch(["https://srvelk:9200"], ssl_context=context, api_key=api_key)
es.cat.nodes()
This looks better 🙂
Conclusion
If you made it here, congratulations! You should now be able to create a connection with the Python Elasticsearch client. Please consult the official documentation or leave me a comment in case of trouble. You can also connect with me or follow on linked-In.
If Google brought you here, you might check also the whole series.