

Welcome to the second part of the Beats workshop. You can find the first workshop here. As usual, to keep each article as compact as possible, I will shortcut the code to snippets. If you want to see the complete code, please consult my GitHub page for this workshop. If Google brought you here, you might also check the other parts of the series.
Today, we create our first Metricbeat module and metricset. While the official documentation explains very well how to set up your development environment, it can be quite challenging to figure out, how to write a Metricbeat module. While deeper knowledge of the language Go is not required for this workshop, I recommend the Udemy course „Go: The Complete Developer’s Guide (Golang)“ by Stephen Grider to get some basic knowledge of the language. To be honest: two weeks before I wrote this article, I had not the faintest clue about Go – but the course helped me to understand what’s going on under the hood and to understand the source code (and therefore the mechanics) of the Metricbeat modules that are delivered within the default installation.
Our first Metricbeat module will use a very simple configuration as input for data collection – to warm up. However: in the third part of the series, we will dive in deeper and develop a metricset that is based on a more practical use case. For today we will cover these topics:
- set up Go and the dev environment
- defining the use case
- defining the data structure
- defining the configuration for the module and the metricset
- coding the metricset
- compiling and configuring metricbeat
- testing the metricset
As you see, there is plenty of work to do – please grab yourself a tea and strap in for the ride. Enough with the talk: let’s jump right in!
Setting up Go and the dev environment
Install Go
Bear in mind, that we will clone several Git Repos and therefore need Gigabytes of disk space. With 10GB of free space, you will be good.
Before you set up Go, please check your Go version with:
go versionIf you have a version lower than 1.17.8 you need to install Go from the official repo. The official documentation leads you through the process, however, I shortcut it for you. We need to install python 3.7 and Go 1.17.8:
sudo apt install python3.7
sudo apt-get install python3-venv
sudo mkdir -p /usr/local/go
wget https://go.dev/dl/go1.17.8.linux-amd64.tar.gz
sudo tar -C /usr/local/ -xzf go1.17.8.linux-amd64.tar.gz
export PATH=/usr/local/go/bin:$PATH
Check the go version again, you should see something like „go version go1.17.8 linux/amd64“.
Clone the official Beats Repo
Install now the dev env by setting the $GOPATH environment variable and cloning the official beats Git Repo:
mkdir ~/go
export GOPATH=~/go
mkdir -p ${GOPATH}/src/github.com/elastic
git clone https://github.com/elastic/beats ${GOPATH}/src/github.com/elastic/beats
Install Mage
Install mage, it is needed for Go builds and will setup the rest of the dev environment:
cd ~
git clone https://github.com/magefile/mage
cd mage
go run bootstrap.go
sudo cp $GOPATH/bin/mage /usr/local/bin
cd ${GOPATH}/src/github.com/elastic/beats
make update
The difference between a module and a metricset
First: what is the difference between a module and a metricset? The module holds one or more metricsets. While the module is the top folder, it holds a folder for each metricset and a „_meta“ folder. The following diagram shows the structure:
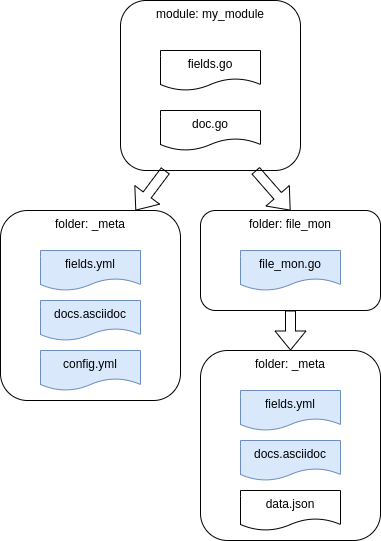
The files in the top folder „my_module“ will not be modified by us. „fields.go“ and „doc.go“ are generated. We will only work with the files „fields.yml“, „docs.asciidoc“, „config.yml“ and „file_mon.go“. Or in other words: the blue-marked fields in the diagram.
Creating the module and metricset skeleton files
Once the dev environment is set, we create a skeleton for our new Metricbeat module and metricset:
cd ${GOPATH}/src/github.com/elastic/beats/metricbeat
make create-metricset
We will enter the following values:
Module name: my_module
Metricset name: file_mon
make should end with:
Module my_module created.
Metricset file_mon created.
Just to test if everything works, we will now compile Metricbeat:
mage update
mage build
chmod go-w ~/go/src/github.com/elastic/beats/metricbeat/metricbeat.yml
/metricbeat -e -d "*"
Defining the use case
We will do something fairly simple: we will check if a file is constantly modified and therefore has actual data.
We monitor these files by checking the modification timestamp every 10 seconds, and send the difference between modification time and the actual time to Elasticsearch – we will call the difference „delta“. We do not set a threshold for an alert, that is the use case for the next workshop. We only want to add a list of files to the configuration in my_module.yml and send to Elasticsearch the filename and the delta.
Defining the data structure in my_module/_meta/config.yml
First: the path
~/go/src/github.com/elastic/beats/metricbeat/module/my_modulewill be shortened from this point to just my_module.
The data structure, in this case, is very simple: it’s just a list of filenames. Since „make metric-set“ has created all the files we will need, we can implement the needed structure in a file in our my_module folder that will be used as the default config file for our future module my_module. Please open the file „my_module/_meta/config.yml“. You should see something like:
- module: my_module
  metricsets: ["file_mon"]
  enabled: false
  period: 10s
  hosts: ["localhost"]
Replace it with:
- module: my_module
  metricsets: ["file_mon"]
  enabled: true
  period: 10s
  hosts: ["localhost"]
  files:
  - "/var/log/syslog"
Now, as you might guess, „var/log/syslog“ is defined, just to give the future user an idea of how filenames have to be placed in our future config file my_module.yml. This config file will be the blueprint for the generated file my_module.yml, which will be created once we compile and build Metricbeat at the end of the process.
The important thing about the configuration file config.yml is, it contains the configuration of all metric sets. If you add multiple metric sets, make sure you add all of them to config.yml.
Define the configuration for the module and the metricset
my_module/_meta/docs.asciidoc
Step by step we define first our configuration files. As a first step, we add a description to our my_module documentation. Feel free to add a comment like this to the file my_module/_meta/docs.asciidoc:
This is the my_module module.
You can find the sourcecode in https://github.com/PascalThalmann/ElasticBeatWorkshop/tree/master/2_create_a_module_1
my_module/_meta/fields.yml
The file my_module/_meta/fields.yml contains the top-level information about the module. We only change the description since the rest is fine:
- key: my_module
  title: "my_module"
  release: beta
  description: >
    my_module module is part of the metricbeat workshop 2
  fields:
    - name: my_module
      type: group
      description: >
      fields:
my_module/file_mon/_meta/docs.asciidoc
As you might guess, the file my_module/file_mon/_meta/docs.asciidoc contains the description. Feel free to add something like this:
This is the file_mon metricset of the module my_module.
The metricset reads the last modicfication time and subtracts it from the current time. The result will be a field delta wich will be send to the Elasticsearch cluster
my_module/file_mon/_meta/fields.yml
The file my_module/file_mon/_meta/fields.yml contains the field definitions of our metricset. It will be used to create the correct mapping in the elasticsearch index for metricbeat. Setting here the correct structure and core data types is crucial. If you are not sure which core data type you need, check the data types in the official documentation. We will add a field „file_name“ type „keyword“:
- name: file_mon
  type: group
  release: beta
  description: >
    file_mon
  fields:
    - name: files
      type: object
      description: >
        the filenames with full path of the files that will monitored
coding the metricset
Ok, we defined all config files. Let’s code now the metricset, the code is located in the file my_module/file_mon/file_mon.go
define the needed data structure for the MetricSet
We define now the struct for the object MetricSet. While Go is not an Object-Oriented language, a struct could be seen as a collection of attributes of an object. Each attribute must be defined by a data type and if data is added to that struct, the datatype of the field must match with the data you add to that field. Therefore, when we work with a struct, the data we work with must be assigned to the correct field and have the correct data type. Since we are only reading a list of files, a list with values of type string will do it:
type MetricSet struct {
        mb.BaseMetricSet
        files           []string
}
You might have seen that there is another thing defined in this struct: mb.BaseMetricSet. This is where the magic plays: this is an interface and implements all methods needed to read the configured options in my_module.yml. Long story short: the interface mb.MetricSet lets us read the config file in a very convenient, almost lazy way.
create the MetricSet instance
The next thing we will look at is the „New“ function. This function will read the configuration and will use the struct MetricSet as a store for the values we read from the configuration file my_module.yml:
func New(base mb.BaseMetricSet) (mb.MetricSet, error) {
  cfgwarn.Beta("The my_module file_mon metricset is beta.")

  type Config struct {
	Files      []string `config:"files"`
  }

  config := Config{}

  if err := base.Module().UnpackConfig(&config); err != nil {
    return nil, err
  }

  return &MetricSet{
    BaseMetricSet: 	base,
    files:		config.Files,
    }, nil
}
You might ask yourself, where is the reading part. It’s here:
Files []string `config:"files"`We define here list named Files and assign everything in our configuration that is defined under the field „files“. And our config file looks like this:
- module: my_module
...
  files:
  - "/var/log/syslog"
We might take a look at the &MetricSet object:
  return &MetricSet{
    BaseMetricSet: 	base,
    files:		config.Files,
    }, nil
What we return here is a reference to the struct MetricSet. The ampersand stands for referencing the memory address of MetricSet. You will learn more about structs and how they should be passed to functions later.
Fetch the data and send it to Elasticsearch
We loop now through our list of files, read the modification time and subtract it from our actual time. We need for this our MetricSet, and the libraries „os“ as well as „time“ and „math“. The function is straightforward, but to understand the details, you need a deeper look into the language Go:
func (m *MetricSet) Fetch(report mb.ReporterV2) error {
	files := m.files

	for _, file_name := range files{

		act_time := time.Now()
		f, _ := os.Open(file_name)
		out, _ := f.Stat()
		mod_time := out.ModTime()
		difference := act_time.Sub(mod_time).Seconds()
		delta := int(math.Round(difference))
So let’s have a look at the first line:
func (m *MetricSet) Fetch(report mb.ReporterV2) error {The Method „Fetch“ is called with a parameter that takes the mb.ReporterV2 method. The mb.ReporterV2 method sends data to Elasticsearch. The Fetch method returns finally an error object. So no matter what happens, the Fetch method always returns something.
„m *MetricSet“ is a „receiver“: it means, we can access and manipulate the struct MetricSet with the dot notion. The asterisk tells us, that we access the struct MetricSet over a reference, which is in Go important since structs that are passed to a function are copied. Therefore you should always pass to a function a reference of a struct if you want to manipulate the original struct — otherwise, you manipulate only a copy of that struct.
files := m.filesFor convenient ways, I copied the list of files that are stored in the struct MetricSet. The „:=“ notion means the variable „files“ is initialized.
for _, file_name := range files{The only thing to mention here is the „_“ part of the call for the loop. Looping an array in Go with „range“ returns two values: the key and the value – therefore you need to define two variables. But what if you don’t need the element key? Go will report an error if a variable is not used. But you can surpass this by just using a „_“ if you don’t need that variable.
act_time := time.Now()I am accessing here the time package. Please have a look a the official Go documentation for further use cases.
Let’s take a look at the part of the loop where we do some system calls:
f, _ := os.Open(file_name)
out, _ := f.Stat()
mod_time := out.ModTime()
I am accessing the Go os package and using the „os.Open method“ to get access to the file. Then I use the „Stat“ interface on that file object to gather statistics like the modification time. Interfaces are a very powerful way in Go to use methods despite Go is not object-oriented. To make it short: interfaces are providing methods for the same kind of objects, like this file object.
difference := act_time.Sub(mod_time).Seconds()
delta := int(math.Round(difference))
Ok, we call again the time library and subtract the modification time from the actual time. Since the object is of type float, I use the math library and the round method to get the right value to finally cast the float type to int.
Finally, we send the report with the filename and the delta:
report.Event(mb.Event{
	MetricSetFields: common.MapStr{
			"delta": delta,
			"file": file_name,
	},
})
We call the Event function from the ReporterV2 method and place the values we want to send into the struct to return.
That’s it! For the full code check the GitHub Repo for this workshop.
compiling and configuring metricbeat
If you set up your dev environment right, you should be able to change into the root folder of metricbeat and compile the new module and metricset with mage:
cd ~/go/src/github.com/elastic/beats/metricbeat
mage update
mage build
Before we test our module with the fresh compiled Metricbeat binary, you need to set up the metricbeat.yml config file for a connection to the Elasticsearch cluster. And since you cloned probably the latest metricbeat-version from GitHub, you need to add the following option to our metricbeat.yml:
output.elasticsearch.allow_older_versions: trueIn case you want to see only entries from the new module you also need to disable the system module – it is enabled by default:
./metricbeat modules disable system
./metricbeat modules enable my_module
testing the metricset
You might start Mericbeat with verbose logging:
./metricbeat -e -d "*"The documents should appear in your metricbeat index:

Conclusion
If you made it here: Congratulations! You should now be able to create your Metricbeat module and metricset. This was an example with a fairly simple configuration that needs some unnecessary tweaks on the Elasticsearch/Kibana side. The next workshop will show you, how to create and read a more sophisticated configuration, which will add some intelligence to the metricset.
If you have questions, leave a comment, connect or follow me on LinkedIn